How to Add a Property in WordPress using WP Property Drive
This guide will walk you through the process of adding a property listing to your WordPress website using the WP Property Drive plugin.
Getting Started
Before you begin, make sure you:
- Are logged into your WordPress admin dashboard
- Have the WP Property Drive plugin installed and activated
- Have the necessary permissions to add properties
Creating a New Property
- From your WordPress dashboard, go to Properties in the left sidebar menu
- Click Add New at the top of the page
- You’ll be taken to the property editor screen where you can fill in all the details
Property Title and Description
Title
At the very top of the page, you’ll see a text field for the property title. This should be a clear, descriptive name for the property.
Examples:
- “3 Bedroom Semi-Detached House in Dublin 4”
- “Luxury Penthouse Apartment, Galway City Centre”
- “Commercial Office Space, Cork Business Park”
Description
Below the title, you’ll find the main content editor. This is where you write the full description of the property. You can:
- Add detailed text about the property
- Use formatting (bold, italic, bullet points)
- Add headings to organize the content
Tip: Write a compelling description that highlights the property’s best features, location benefits, and unique selling points.
Property Media (Images)
WP Property Drive provides two ways to manage property images:
Option 1: Local WordPress Images (Recommended for Manual Uploads)
This option stores images directly in your WordPress media library. This is the best choice when you’re adding properties manually.
- Find the Property Media (Images, Videos and 3D Tours) section marked with “WordPress” and “Local” badges
- Click the Manage Media button
- The WordPress Media Library will open
- You can either:
- Upload new images: Click “Upload Files” and select images from your computer
- Use existing images: Select images already in your Media Library
- Select all the images you want to add to the property
- Click Select or Insert to add them
Reordering Images
- After adding images, you’ll see them displayed in a gallery below
- Drag and drop images to change their order
- The first image will be the main/featured image shown on property cards
Property Tours
Below the images, you’ll find a Property Tour(s) text area where you can add:
- Virtual tour links (e.g., Matterport)
- YouTube video links
- 3D walkthrough URLs
Add one URL per line.
Option 2: Remote Feed Images
This section is for images that come from your CRM or property management system via an automated feed. If you’re manually adding a property, you typically won’t use this section.
If you do need to use it:
- Click on Property Media (Images) marked with “Feed” and “Remote” badges
- Images can be reordered by dragging them
- Click the × button to remove an image
Important: If your property is connected to a feed, changes made here will be overwritten on the next sync unless you “lock” the property.
Property Details
Status
Select the current status of the property:
- For Sale – Property is available for purchase
- To Let – Property is available for rent
- Sale Agreed – An offer has been accepted
- Sold – Property has been sold
- Sold (STC) – Sold Subject to Contract
- Under Offer – Offer being considered
- Let Agreed – Rental agreement in progress
- Let – Property has been let
Market
Choose where the property falls in the market:
- Residential – Houses, apartments, etc.
- Commercial – Offices, retail, industrial
- Development – Land for development
- Farm – Agricultural properties
- New Homes – Newly built properties
Selling Method
How the property is being sold:
- Private Treaty – Standard sale through negotiation
- Auction – Sold at public auction
- Tender – Sealed bids process
Address Fields
- Display Address – The address shown publicly (e.g., “Main Street, Dublin 2”)
- Address Line 1 – First line of the full address
- Address Line 2 – Second line (optional)
- Address Line 3 – Third line (optional)
Property Type
Select the type of property:
- Apartment
- Bungalow
- Detached House
- Semi-Detached House
- Terraced House
- Townhouse
- Duplex
- Penthouse
- Studio
- Site
- Land
- Office
- Retail
- Industrial
- Warehouse
- And more…
Living Type
If applicable, specify:
- Retirement Living
- Student Accommodation
- Social Housing
- Assisted Living
Property Category (Optional)
Add custom categories like:
- Investment
- Waterfront
- Urban
- Coastal
Age Category (Optional)
Describe the property age:
- Modern
- New
- Period
- Recently Refurbished
Bedrooms
Enter the number of bedrooms (just the number, e.g., “3”)
Bathrooms
Enter the number of bathrooms (just the number, e.g., “2”)
Property Size
Enter the property size in square metres or square feet (just the number)
Property Size (Land)
For properties with land, enter the acreage
Fit Out (Commercial Properties)
For commercial properties, select the fit-out level:
- Shell & Core
- Developer’s Finish
- Fitted
- Fully Fitted
- Partially Fitted
- Turnkey
- Furnished
- Speculative Fit-out
- As Is
Timing (Availability)
When is the property available?
- Immediately
- Within 1 Month
- Within 3 Months
- Within 6 Months
- Within 12 Months
- By Agreement
- On Completion
- Negotiable
- To Be Confirmed
Property Taxonomies (Type, Area, County)
In addition to the property details fields, WP Property Drive uses WordPress taxonomies to categorize properties. These appear in the right sidebar of the property editor (or below the main content on smaller screens).
What are Taxonomies?
Taxonomies are like categories or tags that help organize and filter your properties. They make it easy for visitors to search and browse properties by specific criteria.
Property Type
The Property Type taxonomy categorizes properties by their physical type.
- Look for the Property Type panel in the right sidebar
- You can either:
- Select an existing type: Check the box next to the appropriate property type
- Add a new type: Click “Add New Property Type” at the bottom of the panel
- Common property types include:
- Apartment
- House
- Bungalow
- Site
- Commercial
- Land
Important: Select only one property type per property.
Area
The Area taxonomy allows you to categorize properties by their locality (town, village, or neighbourhood).
- Look for the Area panel in the right sidebar
- You can either:
- Select an existing area: Check the box next to the appropriate area
- Add a new area: Click “Add New Area” at the bottom of the panel
- Examples of areas (localities):
- Ballsbridge
- Salthill
- Blackrock
- Killarney
- Malahide
- Kinsale
Important: Select only one area per property. Areas are useful for location-based searches on your website.
County
The County taxonomy categorizes properties by their county.
- Look for the County panel in the right sidebar
- You can either:
- Select an existing county: Check the box next to the correct county
- Add a new county: Click “Add New County” at the bottom of the panel
- Irish counties include:
- Dublin
- Cork
- Galway
- Limerick
- Kerry
- Mayo
- Wicklow
- Waterford
- Clare
- Donegal
- And all other Irish counties…
Important: Select only one county per property.
Managing Taxonomies
You can also manage all taxonomy terms from a central location:
- Go to Properties in the left sidebar
- Click on Property Types, Areas, or Counties (depending on which you want to manage)
- From here you can:
- Add new terms
- Edit existing terms
- Delete terms
- Set parent/child relationships (hierarchical taxonomies)
Note: Deleting a taxonomy term will remove it from all properties that use it.
Price Details
Important: Only enter numerical values – no commas, periods, or currency symbols. The currency is set in your plugin settings.
Price
Enter the asking price or rental amount (e.g., “350000” for €350,000)
Sold Price
If the property has sold, enter the final sale price
Price Prefix
Add text before the price:
- “Guide Price”
- “From”
- “Starting at”
- “Offers over”
Price Term (For Rentals)
Select how the rental price is charged:
- Per Month
- Per Week
- Per Year (Per Annum)
Floorplans
Enter URLs to floorplan images. If you have multiple floorplans, separate them with a vertical pipe symbol (|)
Example: https://example.com/floor1.jpg|https://example.com/floor2.jpg
BER & Energy Details
BER Rating
Enter the Building Energy Rating:
- A1, A2, A3
- B1, B2, B3
- C1, C2, C3
- D1, D2
- E1, E2
- F
- G
- Exempt
BER Number
Enter the official BER certificate number
Energy Details
Add any additional energy information (heating type, insulation details, etc.)
Location Details
Interactive Map
An interactive map is displayed in this section. You can:
- Drag the map to navigate to the property location
- Click on the map to place a marker at the exact property location
- The latitude and longitude will automatically update
Latitude & Longitude
These fields are automatically filled when you click on the map. You can also enter coordinates manually if you know them.
Eircode
Enter the property’s Eircode (Irish postcode)
Area
This may be automatically set based on the location
County
This may be automatically set based on the location
Country
Enter the country (defaults to Ireland)
International Property
Check this box if the property is located outside Ireland
Agent Details
Agent ID
Enter a unique identifier for the agent (internal use)
Agent Qualification
Enter the agent’s professional qualifications (e.g., “MIPAV”, “SCSI”)
Agent Name
Enter the name of the agent handling this property
Agent Email
Enter the agent’s email address for enquiries
Agent Phone
Enter the agent’s office phone number
Agent Mobile
Enter the agent’s mobile phone number
Office ID
Enter the office’s unique identifier
Office Name
Enter the name of the office/branch
Office Address
Enter the full address of the office
Attachments (Brochures)
You can add up to three brochure links:
Brochure 1, 2, 3
Enter the URL to the property brochure PDF
Tip: Upload your brochures to the WordPress Media Library first, then copy the file URL.
Additional Property Information
These text areas allow you to add detailed information:
Property Accommodation
Describe the accommodation layout in detail:
- Room-by-room breakdown
- Room sizes
- Special features of each room
Property Features
List key features and highlights:
- Central heating type
- Double/triple glazing
- Alarm system
- Solar panels
- etc.
Amenities
Describe nearby amenities:
- Schools
- Shops
- Transport links
- Parks
- Restaurants
Directions
Provide directions to the property:
- From main roads
- Landmarks to look for
- Public transport options
Disclaimer
Add any legal disclaimers or notices required
WordPress-Specific Settings
These settings are stored locally and won’t be affected by feed imports:
Custom Link
Enter a URL if you want the property to link to an external website instead of the property page
Property is Featured
Check this box to mark the property as featured. Featured properties may appear in special sections on your website.
Show in Slider
Check this box if you want this property to appear in the property slider shortcode
Property Brochures
Add multiple brochure URLs (one per line). You can:
- Upload files to the Media Library
- Paste links from Google Drive, Dropbox, etc.
Click Upload/Select Files from Media Library to easily add files.
Property Floorplans
Add multiple floorplan URLs (one per line). Same options as brochures.
Upcoming Viewings
Add scheduled viewing times in the format: Day, Date: Time
Examples:
- Wed, 10 Apr: 17:15 – 17:45
- Sat, 13 Apr: 11:00 – 12:00
Add one viewing per line.
Publishing Your Property
Once you’ve filled in all the relevant fields:
- Review your listing – Check all information is correct
- Set the Featured Image – In the right sidebar, click “Set featured image” and select the main property photo
- Choose a publish date – You can publish immediately or schedule for later
- Set visibility – Usually “Public” for property listings
- Click “Publish” – Your property is now live!
After Publishing
- Preview – Click “View Property” to see how it looks
- Edit – You can always come back to make changes
- Update – Click “Update” to save any changes
Tips for Great Property Listings
- Use high-quality images – Bright, clear photos sell properties
- Write detailed descriptions – More detail helps buyers make decisions
- Keep information accurate – Double-check prices, sizes, and features
- Update regularly – Keep the status current (especially when sold or let)
- Add all relevant documents – Brochures and floorplans add value
This guide is for WP Property Drive v4.0.0 and later.
Why Aren’t My Website Enquiry Emails Reaching My Inbox?
Table of Contents
- 1. How your website emails are sent
- 2. What “Success” in Post SMTP actually means
- 3. What “Delivered” in SendGrid means
- 4. The usual culprit: IT security blocking wordpress@yourdomain.com
- 5. How to troubleshoot – step by step
- 6. Optional checks & improvements
- 7. Summary: where the issue usually is
1. How your website emails are sent
A typical setup works like this:
- A user fills in a form on your website (e.g. contact form, valuation form, free appraisal, etc.).
- WordPress passes that form entry to Post SMTP.
- Post SMTP connects to SendGrid (our email delivery service).
- SendGrid hands that email to your recipient mail server (usually managed by your IT company or email provider).
- Your mail server decides what to do with it:
- Deliver to Inbox
- Deliver to Junk/Spam
- Quarantine it
- Block it entirely
So there are three main places things can go wrong:
- The website/form itself
- Post SMTP / SendGrid
- Your email system / IT provider
When Post SMTP and SendGrid both show “success” or “delivered”, it means step 1 & 2 are working. The issue is almost always in step 3.
2. What “Success” in Post SMTP actually means
In Post SMTP, a “successful” status means:
- WordPress successfully handed the email to Post SMTP.
- Post SMTP successfully connected to the external mail service (SendGrid).
- SendGrid accepted the email for delivery.
If there was a problem at this stage (e.g. SMTP authentication failure, wrong API key, DNS issue), you would see errors in the Post SMTP log, not “success”.
So, if Post SMTP shows the email as sent successfully, the email has left the website and is in SendGrid’s hands.
3. What “Delivered” in SendGrid means
In SendGrid, a status of “delivered” means:
- SendGrid successfully handed the email to the recipient’s mail server.
- The recipient’s server responded with a code that means:
“Okay, I’ve accepted this message.”
From SendGrid’s perspective, the job is done. After that, your IT/mail system decides where the email goes:
- Inbox
- Junk/Spam
- Quarantine
- Or silently dropped/blocked
So when you see:
- ✅ Post SMTP: Success
- ✅ SendGrid: Delivered
…it is a very strong indication that the issue is inside the agency’s email system, not on the website.
4. The usual culprit: IT security blocking wordpress@yourdomain.com
Most agencies use an IT company or a managed email service. These systems often have:
- Spam filters
- Quarantine systems
- Block lists / allow lists
- Rules around “suspicious” senders
A very common pattern we see is:
- The website sends from a generic address like
wordpress@yourdomain.com. - The IT system decides this sender is suspicious or “spammy”.
- All emails from that address are:
- Marked as spam
- Quarantined
- Or outright blocked
Until the IT provider:
- Unblocks that sender, and
- Releases the quarantined emails
…you will not see the enquiries in your inbox, even though everything looks perfect in WordPress, Post SMTP and SendGrid.
5. How to troubleshoot – step by step
Step 1: Confirm the website and forms are working
Ask your web team to:
- Submit a test enquiry via your forms.
- Check Form Entries in WordPress
- In most setups:
WordPress → Forms → Entries - Confirm that the test submissions appear there.
- If the entries are visible, the form itself is working.
- In most setups:
- Check Post SMTP logs
- Confirm the test email shows as successful.
- Check SendGrid activity
- Confirm the email shows as “delivered” to the correct recipient address.
If all of the above are confirmed, the website is doing its job.
Step 2: Check your own mailbox (quick checks)
You or your team should:
- Check Inbox, Spam/Junk, and Other/Clutter folders.
- Search for:
- The subject used on the form emails (e.g. “New Website Enquiry”)
- The sender address (e.g.
wordpress@yourdomain.com).
- If you find any:
- Mark them as “Not Spam” / “Not Junk”.
- Add the sender (e.g.
wordpress@yourdomain.com) to your safe senders / allow list in your mail client.
If nothing shows up anywhere, move on to the IT provider.
Step 3: Involve your IT company (this is usually where the fix happens)
When Post SMTP and SendGrid both say success/delivered, your IT provider is the only one who can see what happened on the mail server.
Send them a clear request, for example:
“Our website sends enquiries via SendGrid using
wordpress@ourdomain.comas the sender.
Post SMTP and SendGrid both show the messages as successfully delivered to our address, but we are not receiving them.Please check on your mail server:
- Are emails from
wordpress@ourdomain.combeing blocked, marked as spam, or quarantined?- If so, please release them and allow-list this sender so future website enquiries are delivered to our inbox.”
Specifically ask them to check:
- Quarantine
- Spam filters
- Blocklists / deny rules
- Any rules that might block emails sent “on behalf of” your domain via SendGrid
In many cases, they will find something like:
- “The sender
wordpress@yourdomain.comwas marked as spam and quarantined.” - They then unblock the sender and release the queued emails.
- New enquiries start arriving normally.
6. Optional checks & improvements
To reduce future problems, discuss these with your web team and IT provider:
- Use a clear, dedicated sender address
- e.g.
website@yourdomain.comorno-reply@yourdomain.com(instead ofwordpress@…). - Make sure your IT provider knows this address is legitimate.
- e.g.
- Confirm SPF, DKIM and DMARC are correctly set up
- Your DNS should explicitly allow SendGrid to send emails on behalf of your domain.
- This improves deliverability and reduces the chance of being flagged as spam.
- Have a backup notification address
- For example, send enquiries to both:
- Your main office email (managed by IT), and
- A secondary address (e.g. a generic cloud mailbox).
- If one fails, you still get the enquiries in the other.
- For example, send enquiries to both:
- Regularly review Form Entries in WordPress
- Even if emails fail, the enquiries are often stored in WordPress.
- This can help you recover any “missing” enquiries.
7. Summary: where the issue usually is
When you’re using Post SMTP + SendGrid and you see:
- Post SMTP: ✅ Success
- SendGrid: ✅ Delivered
…then:
- The website is working.
- The forms are working.
- The email has left the website and has been accepted by your mail server.
If the message still isn’t visible in your inbox, the issue is almost always:
- Your IT company’s email security:
- Blocking or quarantining the sender (e.g.
wordpress@yourdomain.com), or - Treating those messages as spam.
- Blocking or quarantining the sender (e.g.
The fix is usually straightforward:
- Confirm via WordPress, Post SMTP and SendGrid that the email was sent and delivered.
- Ask your IT provider to unblock and allow-list the website sender address.
- Check any quarantined emails and release them.
Once that’s done, future website enquiries should arrive reliably in your inbox again.
How to remove old properties from your website
Sometimes, properties may continue to appear on your website even though they should no longer be visible. This can happen for several reasons:
- You forgot to update the status in your CRM.
- You’re no longer using your old CRM.
- The property was deleted from your CRM, but still appears on your website.
- The property is locked on your website.
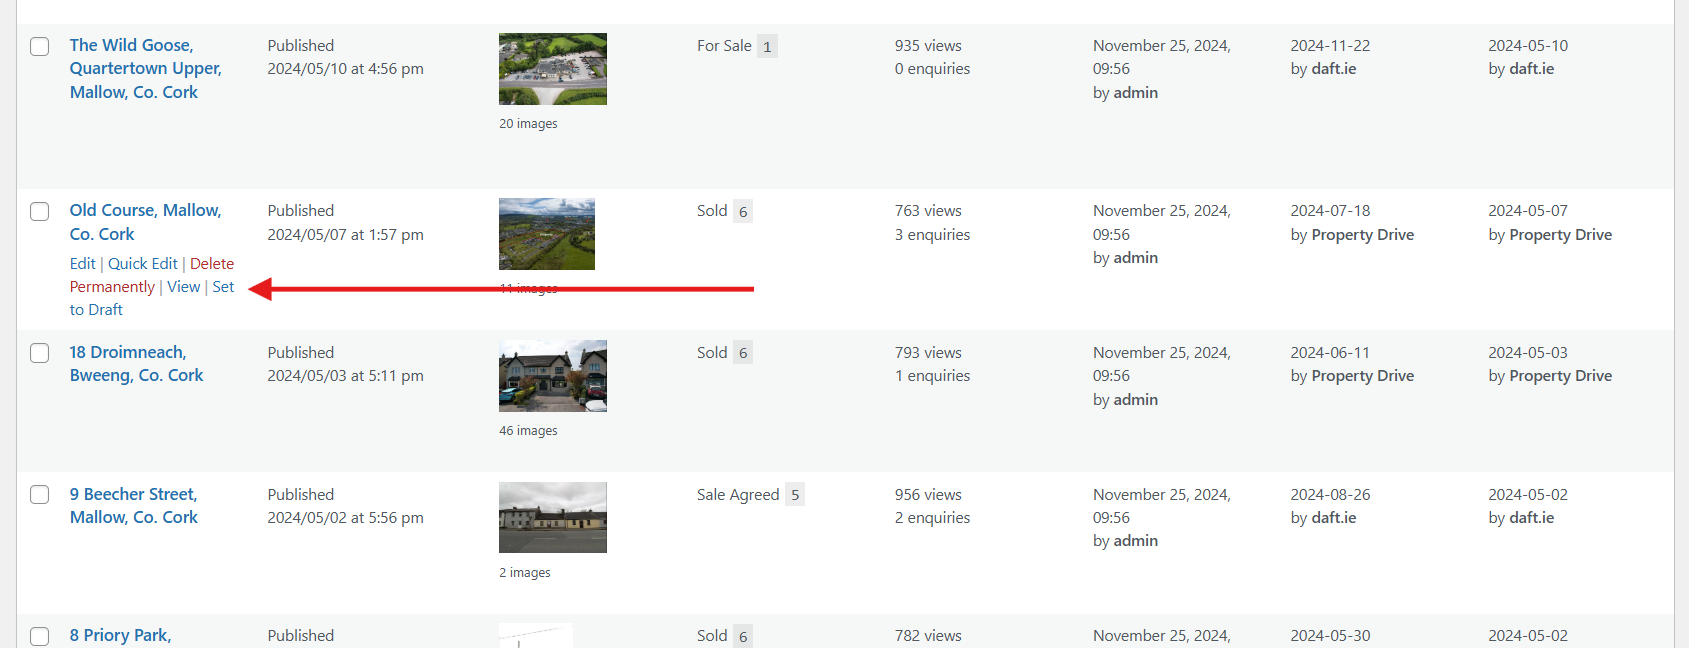
To remove such a property, you can set it to Draft. Here’s how:
- Log into your WordPress website.
- Navigate to Properties.
- Search for the property you want to remove.
- Click the “Set to Draft” quick link.
That’s it! The property is now hidden from your website.
If you decide to reactivate the property in the future:
- Navigate to Properties → Drafts.
- Click on the property you want to re-activate.
- Hit the Publish button.
How to set or reset your website login password
If you’ve forgotten your password to log in to the website’s back-end, or want to set a new one, follow the steps below.
Table of Contents
Login
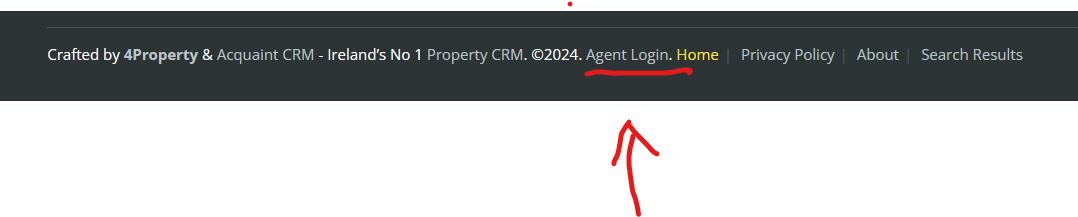
- Check the footer of your website and find the Agent Login link. Click the link and use the provided credentials to log in, or reset your password.
- Alternatively, open your website’s login page (usually
example.ie/wp-login.php).

Lost Your Password?
- Below the login form, you’ll see a link that says “Lost your password?”
- Click this link to begin the password reset process.

Enter your email address or username
- On the next screen, enter the email address or username associated with your account.
- Click Get New Password.

Check your email
- Check your inbox for an email from your website (look for the subject line like “Password Reset Request”).
- If you don’t see the email, check your spam or junk folder.
Click the password reset link
- Open the email and click the link provided to reset your password.
- The link will redirect you to a password reset page on your website.
Set a new password
- Enter a new password in the fields provided.
- Make sure your password is strong, with a mix of uppercase, lowercase, numbers, and special characters.
- Click Save or Reset Password.
Log in with your new password
- Return to the login page, enter your username and the new password, and log in to your website’s back-end.
Helpful Tips
- If you don’t receive the password reset email, confirm that you’re using the correct email address associated with your account.
- If you’re still unable to reset your password, please send an email to help@4property.com for assistance from the helpdesk.
How to Replace an Image / Edit Text
How to Replace an Image / Edit Text on Your Website
- Log In to the Website Backend:
- Use your credentials to access the backend of your website. If you need help, here’s a link to a guide on logging in.
- Find the Page, Post or FAQ to Edit:
- Go to Pages, Posts or FAQs in the left-hand menu, depending on where you need to make changes.
- Locate the specific page, post or FAQ you want to edit and click on it.
To Replace an Image
- Select the Image Block:
- Scroll through the content until you find the image you want to replace.
- Click on the image to select it.
- Replace the Image:
- Once the image is selected, you’ll see a toolbar appear. Click Replace.
- You can either:
- Upload a New Image from your computer.
- Choose from Media Library to select an image already uploaded to your website.

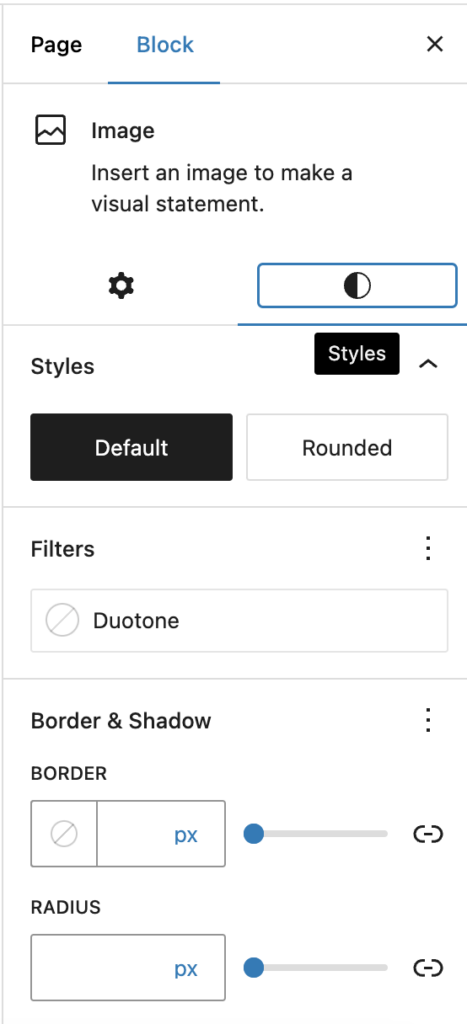
- Adjust Image Settings (Optional):
- After replacing the image, you can adjust settings like alignment or size to fit your layout.
To Edit Text
- Locate the Text Block:
- Scroll through the content to find the text you want to edit.
- Click on the text block to begin editing.
- Edit the Text:
- Simply click inside the text block and start typing to make changes.
- You can format text using the toolbar to adjust bold, italic, alignment, or add links.
Save Your Changes:
- Once you’ve made your edits, click Save / Update (top right corner) to save changes and publish them to the live site.
By following these steps, you’ll be able to keep your website’s content fresh and visually up-to-date, ensuring it always looks its best.
How to Add a New FAQ
How to Add a New FAQ (From Scratch)
- Log In to the Website Backend:
- Use your credentials to access the backend of your website. If you need assistance, here’s a link to a guide on logging in.
- Navigate to the FAQ Section:
- In the left-hand side menu, click on FAQs, then select Add New.

- Add FAQ Content:
- Start by entering a Title for your FAQ.
- Add content by clicking the + button to insert blocks. You can add:
- Headings
- Paragraphs
- Images
- Videos
- And more…

- To rearrange blocks, click on a block and use the up and down arrows.

- Choose or Add a Topic:
- Select a relevant topic from the existing categories, or add a new one if needed.

- Publish the FAQ:
- When you’re done, click Publish to make the FAQ live.

How to Add a New FAQ (Clone)
- Open an Existing FAQ:
- Find the FAQ you want to use as a template and click Edit.

- Copy Content Blocks:
- Click on the three vertical dots (options menu) at the top of the FAQ editor.
- Select Copy All Blocks.

- Create a New FAQ and Paste Content:
- Follow steps 2–4 above to start a new FAQ.
- Paste the copied content using your keyboard shortcut (e.g., Ctrl+V) or by right-clicking with your mouse and selecting Paste.
- Edit and Update Content:
- Modify the text, replace any images, and make any other necessary adjustments.
- Choose the correct topic or add a new one if needed.
- Publish the Updated FAQ:
- Click Publish to make your new FAQ live.
How to Update Google Reviews on Your Website
How to Update Google Reviews on Your Website
- Log In to the Website Backend:
- Use your credentials to log in to the backend of your website.
- If you need assistance with this step, here’s a link to a guide on logging in.
- Access Trustindex.io:
- On the left-hand side menu, find and click on Trustindex.io.

- Navigate to My Reviews:
- At the top of the Trustindex.io page, click on My Reviews.
- Download New Reviews:
- Click the Download New Reviews button to retrieve the latest Google reviews for your website.

Note: You can download new reviews every 10 days. Be sure to check back regularly to keep your reviews up-to-date.
How to make a property as featured
Here’s a step-by-step guide how to make a property as a featured listing on your website:
- Access Properties:
- In your WordPress dashboard, go to the Properties section in the main menu on the left.
- Search For The Property using the Search box:

- Once the property has been found click on Edit:

- Toggle on the Featured option.

- Once you’re done, click Save in the top right corner:

How to add a property
Here’s a step-by-step guide how to add a new property to your website:
- Access Properties:
- In your WordPress dashboard, go to the Properties section in the main menu on the left.
- Click Add New.

- Add the Property Address:
- Enter the property’s address in the Add Title section. This serves as the title for the property listing.
- Write a Description:
- In the content editor, you’ll see Type / to choose a block. Here, enter a detailed description of the property.
- Lock the Property:
- Tick the Lock Property box to prevent the property from being overwritten by any new data feed import.
- Note: Once locked, make any updates directly on the website to ensure they aren’t lost.
- Upload Property Images:
- Go to Property Media > Manage Media.
- Click Upload Files > Select Files and choose your images.
- Once done, click Close. Your images will be visible when you publish or save the property.
- Fill in Property Details:
- Complete essential fields such as:
- Property Status (required)
- Property Address
- Price
- Bedrooms
- Bathrooms
- BER Rating
- Additional fields can be filled in as needed.
- Complete essential fields such as:
- Feature the Property (Optional):
- If this is a featured property, toggle on the Featured option.

- Add Property Tour Links (Optional):
- Enter URLs for virtual tours (e.g., Matterport or YouTube) in the Property Tour(s) section.
- Upload a Property Brochure (Optional):
- First, add the brochure as a media file by going to Media > Add New Media File.
- Then link it in the property listing.

- Select Property Type:
- In the Type section, choose an existing property type or add a new one.

- Select County:
- In County, select the county or add a new category as needed.

- Specify Area:
- Choose the area or add a new one in the Area section.

- Publish the Property:
- Once you’re done, click Publish or Save in the top right corner.
Sample Privacy Policy (Technical)
This website uses cookies. Read more about data processing.
This website uses cookies. We and our partners store and/or access information on a device, such as cookies and process personal data, such as unique identifiers and standard information sent by a device for personalised ads and content, ad and content measurement, and audience insights, as well as to develop and improve products.
Cookies are small text files that can be used by websites to make a user\’s experience more efficient. The law states that we can store cookies on your device if they are strictly necessary for the operation of this site. For all other types of cookies we need your permission. This site uses different types of cookies. Some cookies are placed by third party services that appear on our pages. You can at any time change or withdraw your consent from the Cookie Declaration on our website.
With your permission we and our partners may use precise geolocation data and identification through device scanning. You may click to consent to our and our partners’ processing as described above. Alternatively you may click to refuse to consent or access more detailed information before consenting. Please note that some processing of your personal data may not require your consent, but you have a right to object to such processing. Your preferences will apply to this website only.
Store and/or access information on a device
Cookies, device identifiers, or other information can be stored or accessed on your device for the purposes presented to you.
Vendors can: Store and access information on the device such as cookies and device identifiers presented to a user.
Personalised ads and content, ad and content measurement, audience insights and product development
Ads can be shown to you based on the content you’re viewing, the app you’re using, your approximate location, or your device type.
Ads and content can be personalised based on a profile. More data can be added to better personalise ads and content. Ad and content performance can be measured. Insights about audiences who saw the ads and content can be derived. Data can be used to build or improve user experience, systems and software.
To do basic ad selection vendors can: Use real-time information about the context in which the ad will be shown, to show the ad, including information about the content and the device, such as: device type and capabilities, user agent, URL, IP address. Use a user’s non-precise geolocation data. Control the frequency of ads shown to a user. Sequence the order in which ads are shown to a user. Prevent an ad from serving in an unsuitable editorial (brand-unsafe) context Vendors cannot: Create a personalised ads profile using this information for the selection of future ads. N.B. Non-precise means only an approximate location involving at least a radius of 500 meters is permitted.
Precise geolocation data, and identification through device scanning
Precise geolocation and information about device characteristics can be used.
Your precise geolocation data can be used in support of one or more purposes. This means your location can be accurate to within several meters.
Vendors can: Collect and process precise geolocation data in support of one or more purposes. N.B. Precise geolocation means that there are no restrictions on the precision of a user’s location; this can be accurate to within several meters.
Special purposes and features
Ensure security, prevent fraud, and debug: Your data can be used to monitor for and prevent fraudulent activity, and ensure systems and processes work properly and securely.
Technically deliver ads or content: Your device can receive and send information that allows you to see and interact with ads and content.
Match and combine offline data sources: Data from offline data sources can be combined with your online activity in support of one or more purposes.
Link different devices: Different devices can be determined as belonging to you or your household in support of one or more of purposes.
Receive and use automatically-sent device characteristics for identification: Your device might be distinguished from other devices based on information it automatically sends, such as IP address or browser type.
Google, Facebook, Twitter, LinkedIn and interest-based ads
This website utilizes Google Analytics to get aggregate metrics on website usage. You can control the information Google uses to show you ads. These settings apply when you’re signed into Google services.
You can also turn off ads personalization for the Google ads you see when you are on one of the 2+ million websites that partner with Google and for 100+ other online ad networks.
This website also use Google Demographic and Interest reports to gather anonymous summary demographic information about website visitors such as gender, age range, and areas of interest for adults over the age of 18. You can prevent your data from being collected and used by Google Analytics by installing the Google Analytics opt-out browser add-on.
You can also opt out of Twitter’s interest-based advertising.
You can also opt out of LinkedIn’s interest-based advertising.
If you would like to completely stop interest-based ads from all of the companies on any website or device, you should use web-based tools like aboutads.info and networkadvertising.org. These tools offer a single window to help you opt-out of Interest-based advertising from all member networks. They too use cookies and therefore you need to use them on every browser and device where you wish to opt-out.
Right of deletion
If you need to delete your account and/or collected data, contact us.
<details>
    <summary><strong>This website uses cookies.</strong> Read more about data processing.</summary>

    <p><strong>This website uses cookies.</strong> We and our partners store and/or access information on a device, such as cookies and process personal data, such as unique identifiers and standard information sent by a device for personalised ads and content, ad and content measurement, and audience insights, as well as to develop and improve products.</p>
    <p><small>Cookies are small text files that can be used by websites to make a user\'s experience more efficient. The law states that we can store cookies on your device if they are strictly necessary for the operation of this site. For all other types of cookies we need your permission. This site uses different types of cookies. Some cookies are placed by third party services that appear on our pages. You can at any time change or withdraw your consent from the Cookie Declaration on our website.</small></p>
    <p><small>With your permission we and our partners may use precise geolocation data and identification through device scanning. You may click to consent to our and our partners’ processing as described above. Alternatively you may click to refuse to consent or access more detailed information before consenting. Please note that some processing of your personal data may not require your consent, but you have a right to object to such processing. Your preferences will apply to this website only.</small></p>

    <div class="gdpr-details">
        <details>
            <summary>Store and/or access information on a device</summary>
            <p>Cookies, device identifiers, or other information can be stored or accessed on your device for the purposes presented to you.</p>
            <p><small>Vendors can: Store and access information on the device such as cookies and device identifiers presented to a user.</small>
        </details>
        <details>
            <summary>Personalised ads and content, ad and content measurement, audience insights and product development</summary>
            <p>Ads can be shown to you based on the content you’re viewing, the app you’re using, your approximate location, or your device type.</p>
            <p><small>Ads and content can be personalised based on a profile. More data can be added to better personalise ads and content. Ad and content performance can be measured. Insights about audiences who saw the ads and content can be derived. Data can be used to build or improve user experience, systems and software.</small></p>
            <p><small>To do basic ad selection vendors can: Use real-time information about the context in which the ad will be shown, to show the ad, including information about the content and the device, such as: device type and capabilities, user agent, URL, IP address. Use a user’s non-precise geolocation data. Control the frequency of ads shown to a user. Sequence the order in which ads are shown to a user. Prevent an ad from serving in an unsuitable editorial (brand-unsafe) context Vendors cannot: Create a personalised ads profile using this information for the selection of future ads. N.B. Non-precise means only an approximate location involving at least a radius of 500 meters is permitted.</small>
        </details>
        <details>
            <summary>Precise geolocation data, and identification through device scanning</summary>
            <p>Precise geolocation and information about device characteristics can be used.</p>
            <p><small>Your precise geolocation data can be used in support of one or more purposes. This means your location can be accurate to within several meters.</small></p>
            <p><small>Vendors can: Collect and process precise geolocation data in support of one or more purposes. N.B. Precise geolocation means that there are no restrictions on the precision of a user’s location; this can be accurate to within several meters.</small></p>
        </details>
        <details>
            <summary>Special purposes and features</summary>
            <p><small><b>Ensure security, prevent fraud, and debug:</b> Your data can be used to monitor for and prevent fraudulent activity, and ensure systems and processes work properly and securely.</small></p>
            <p><small><b>Technically deliver ads or content:</b> Your device can receive and send information that allows you to see and interact with ads and content.</small></p>
            <p><small><b>Match and combine offline data sources:</b> Data from offline data sources can be combined with your online activity in support of one or more purposes.</small></p>
            <p><small><b>Link different devices:</b> Different devices can be determined as belonging to you or your household in support of one or more of purposes.</small></p>
            <p><small><b>Receive and use automatically-sent device characteristics for identification:</b> Your device might be distinguished from other devices based on information it automatically sends, such as IP address or browser type.</small></p>
        </details>
        <details>
            <summary>Google, Facebook, Twitter, LinkedIn and interest-based ads</summary>
            <p>This website utilizes Google Analytics to get aggregate metrics on website usage. You can control the information Google uses to show you ads. <a href="https://adssettings.google.com/" target="_blank" rel="noopener noreferrer">These settings</a> apply when you’re signed into Google services.</p>
            <p>You can also <a href="http://www.youronlinechoices.com/ie/your-ad-choices" target="_blank" rel="noopener noreferrer">turn off ads personalization</a> for the Google ads you see when you are on one of the 2+ million websites that partner with Google and for 100+ other online ad networks.</p>
            <p>This website also use Google Demographic and Interest reports to gather anonymous summary demographic information about website visitors such as gender, age range, and areas of interest for adults over the age of 18. You can prevent your data from being collected and used by Google Analytics by installing the <a href="https://tools.google.com/dlpage/gaoptout?hl=en" target="_blank" rel="noopener noreferrer">Google Analytics opt-out browser add-on</a>.</p>
            <p>You can also <a href="https://help.twitter.com/en/safety-and-security/privacy-controls-for-tailored-ads" target="_blank" rel="noopener noreferrer">opt out</a> of Twitter’s interest-based advertising.</p>
            <p>You can also <a href="https://www.linkedin.com/help/linkedin/answer/62931/manage-advertising-preferences" target="_blank" rel="noopener noreferrer">opt out</a> of LinkedIn’s interest-based advertising.</p>
            <p>If you would like to completely stop interest-based ads from all of the companies on any website or device, you should use web-based tools like <a href="http://optout.aboutads.info/" target="_blank" rel="noopener noreferrer">aboutads.info</a> and <a href="http://optout.networkadvertising.org/" target="_blank" rel="noopener noreferrer">networkadvertising.org</a>. These tools offer a single window to help you opt-out of Interest-based advertising from all member networks. They too use cookies and therefore you need to use them on every browser and device where you wish to opt-out.</p>
        </details>
        <details>
            <summary>Right of deletion</summary>
            <p>If you need to delete your account and/or collected data, contact us.</p>
        </details>
    </div>
</details>
How to correctly configure GDPR privacy and user consent
This is a two-step operation.
Step 1 — Your WordPress Website
First, install the WP Google Consent Platform plugin for WordPress. Go to WP GCP, in your WordPress Dashboard, and configure the plugin:

Checklist
- Make sure you have a Privacy policy page for your website. Make sure it is correctly assigned in WordPress’ Settings -> Privacy section.
- Make sure you tick the “Show the GDPR/Privacy Policy modal popup” checkbox (as illustrated in the screenshot above).
- Depending on your requirements, tick or untick the “Hide Deny/Reject button”. This will hide the “Deny/Reject” button, making the users unable to browse your website without accepting the privacy policy.
- Make sure you add a valid Google Tag Manager ID (as illustrated in the screenshot above).
- Make sure you add a valid Data Privacy Officer email address (as illustrated in the screenshot above). This email will be used for user enquiries, complaints, or data removal requests.
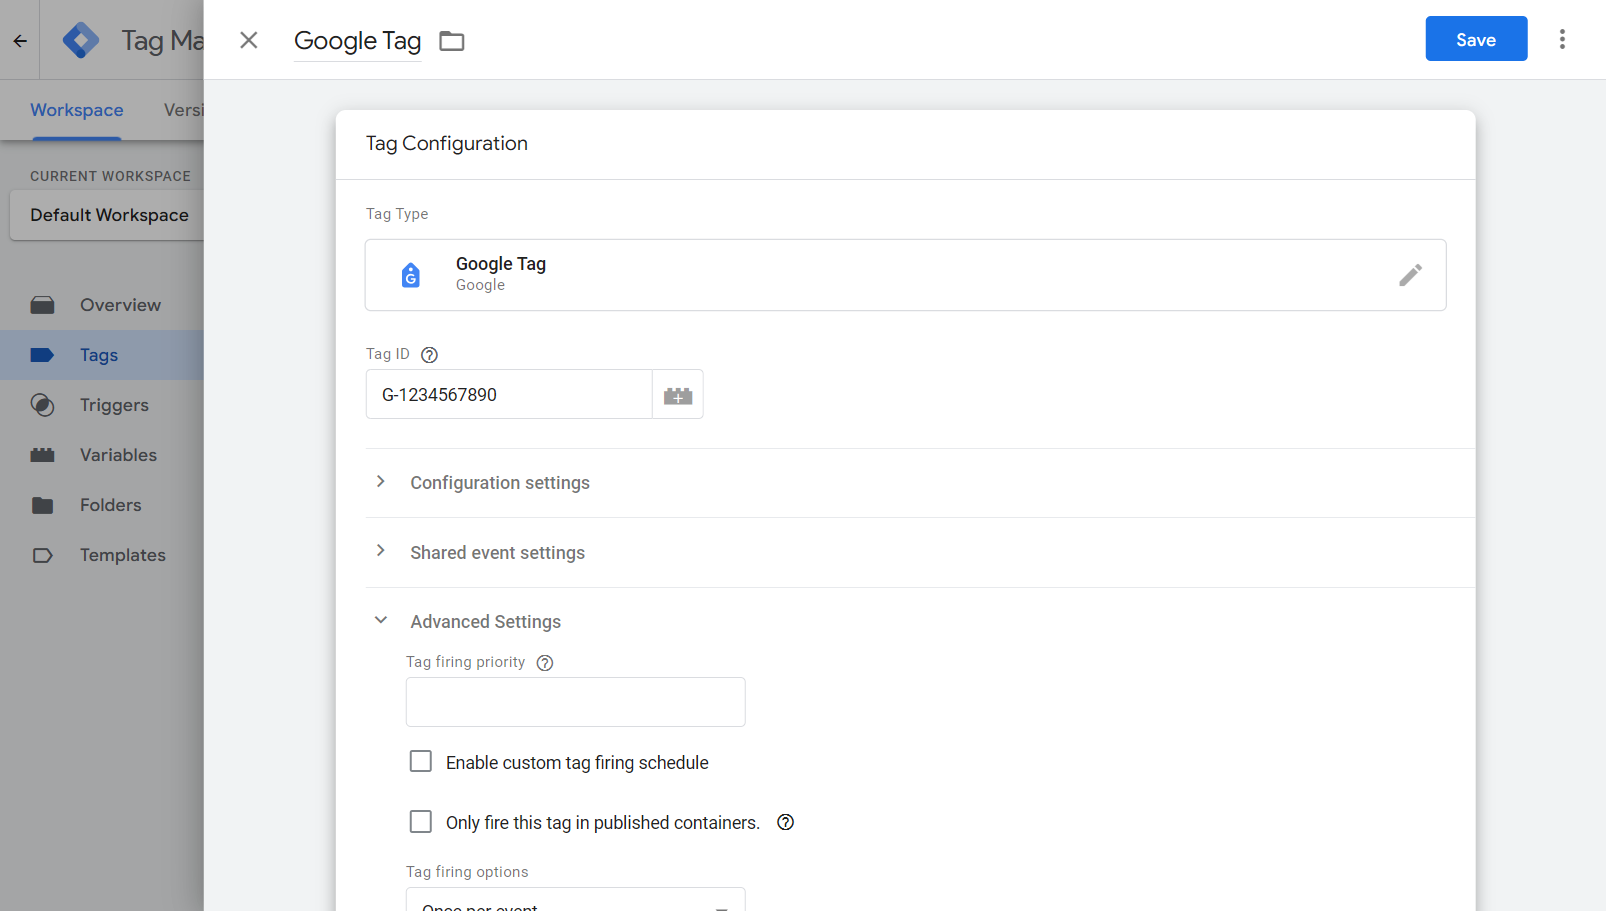
Step 2 — Google Tag Manager
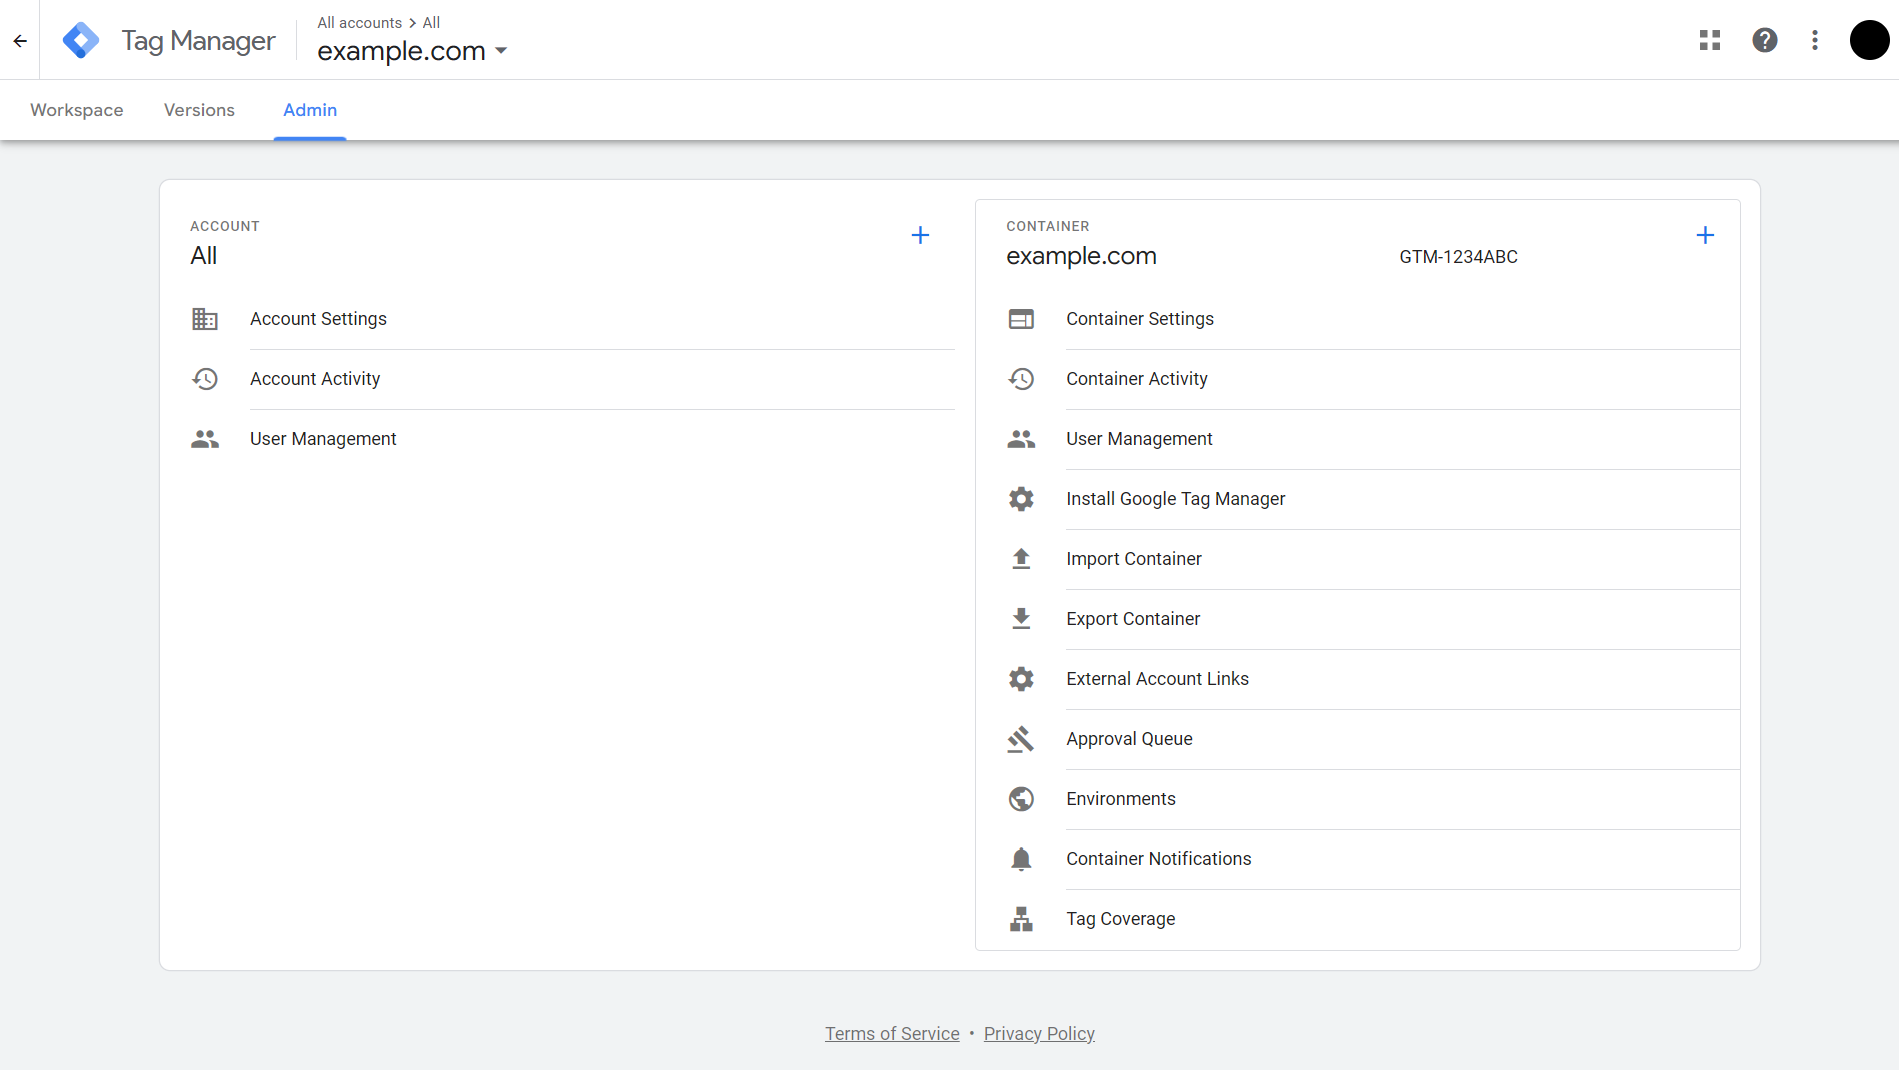
Head over to your Google Tag Manager account, select the Admin tab, go to Container Settings and enable Consent Mode (tick the “Enable consent overview” checkbox).

Next, go to each Tag you need to set consent for, go to Advanced Settings -> Consent Settings and tick the “No additional consent required” checkbox.
Select this option to indicate that your tag does not need to check for additional consent in order to fire. Note that all Google tags have built in consent modes. Other networks and providers might have built-in consent modes, such as Facebook, X, LinkedIn, and so on.
If a provider requires a specific consent mode, then tick the “Require additional consent for tag to fire” checkbox, and add your consent modes.

4Bids User Manual
Table of Contents
- How To Activate Your 4Bids Account On Your Website
- Step 1. Visit your website and scroll down to the very bottom of the home page and click on Agent Login.
- Step 2. You will be redirected to a login page.
- Step 3. Enter your username and password to access the Dashboard on your website.
- Step 4. Click on Property Drive -> then select 4Bids, where you will see the 4Bids Dashboard.
- Step 5. Click on the General Settings tab next to the Dashboard tab.
- Step 6. Scroll down the page in the General Settings tab.
- Step 7. Scroll down to the bottom of the page in the General Settings tab to Email Settings.
- Step 8. To Activate A Property For 4Bids To Allow Online Bids
- Step 9. Congratulations! Your property listing is now activated for online bidding!
How To Activate Your 4Bids Account On Your Website
Step 1. Visit your website and scroll down to the very bottom of the home page and click on Agent Login.
Step 2. You will be redirected to a login page.
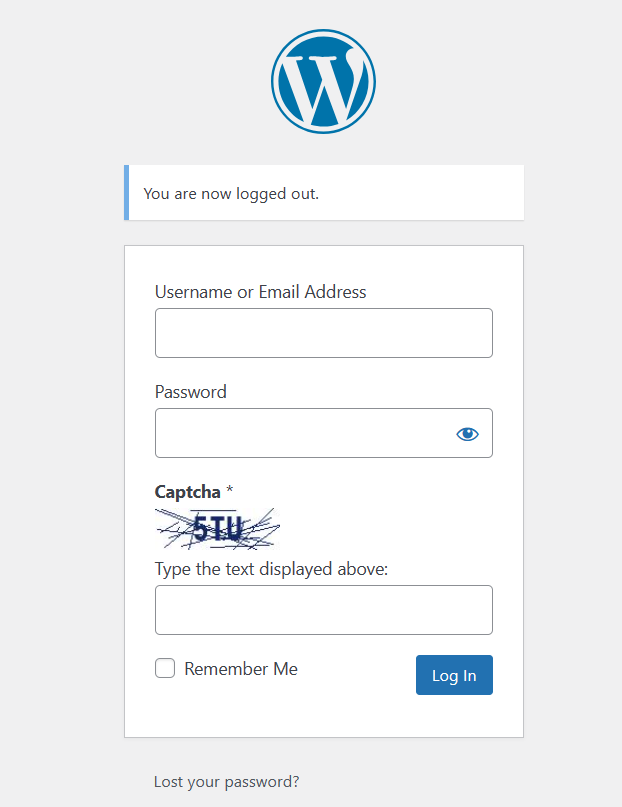
Step 3. Enter your username and password to access the Dashboard on your website.
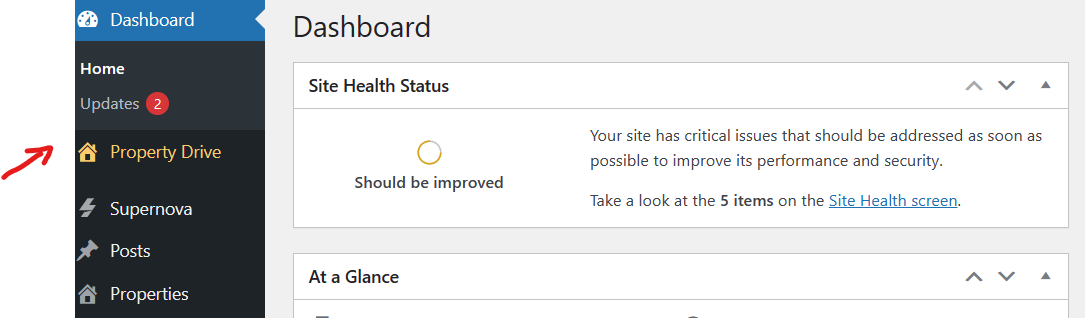
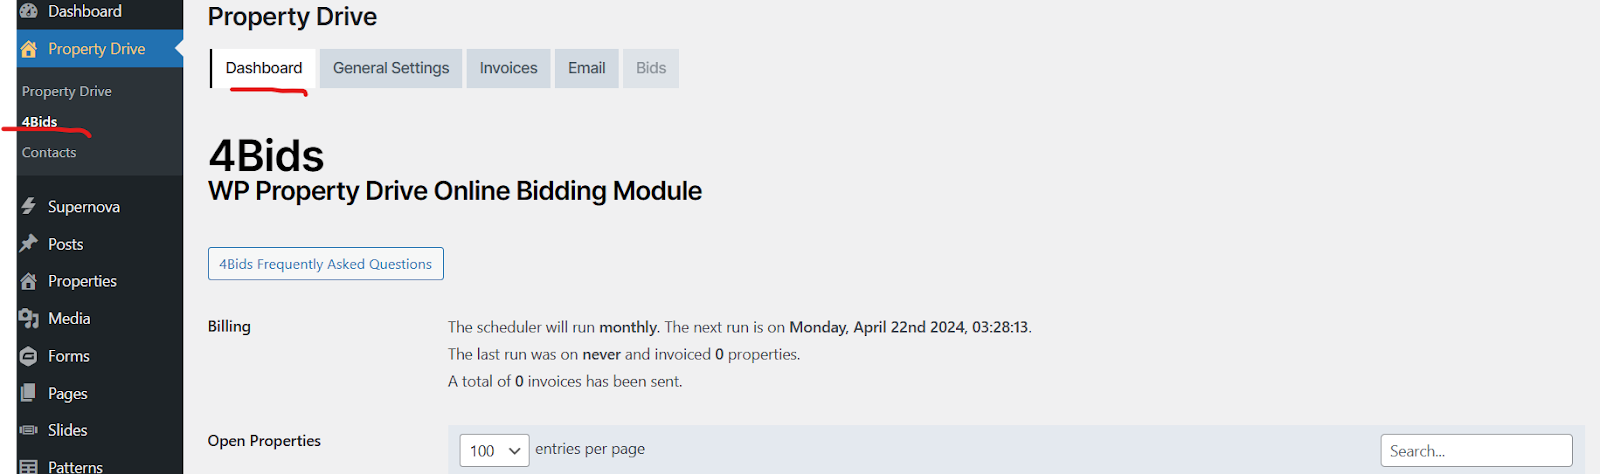
Step 4. Click on Property Drive -> then select 4Bids, where you will see the 4Bids Dashboard.
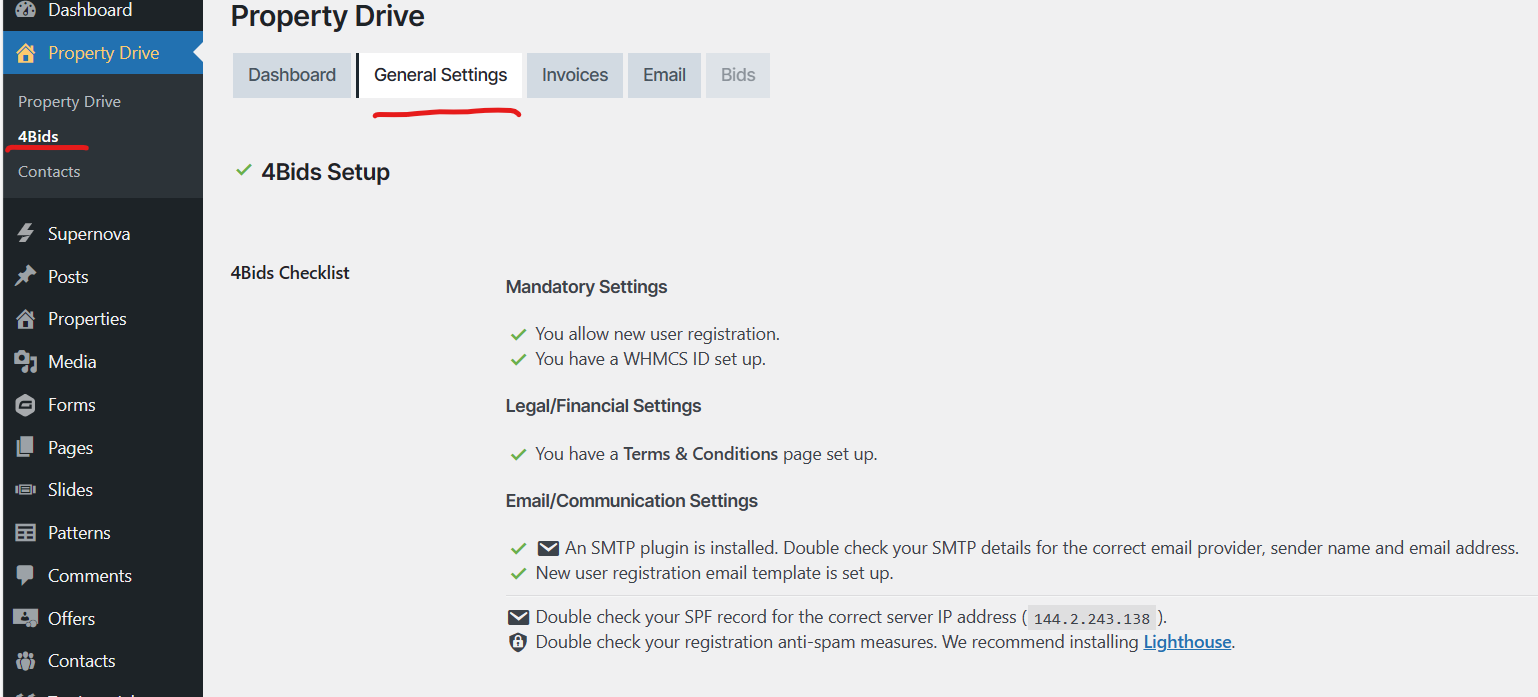
Step 5. Click on the General Settings tab next to the Dashboard tab.
This will allow you to set up the account settings. You will only need to do this part of the process one time.
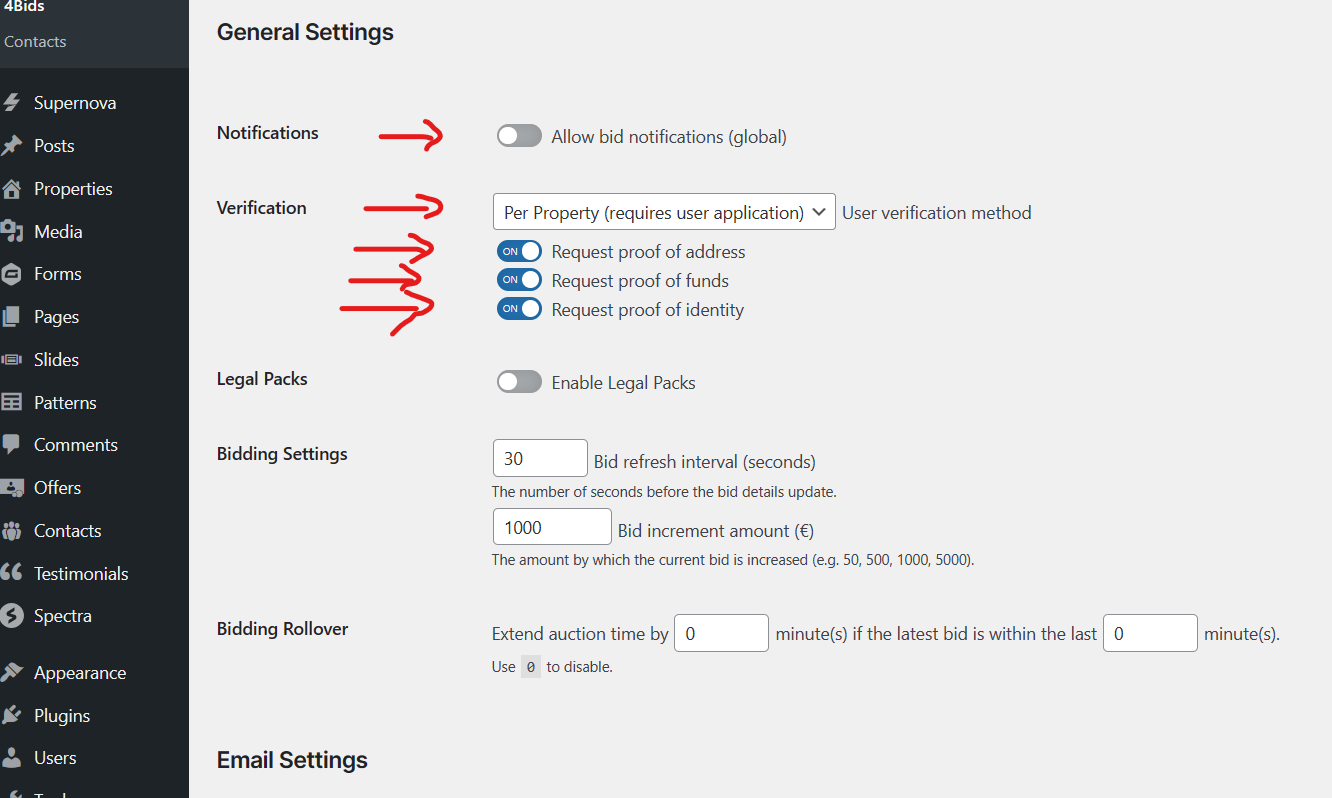
Step 6. Scroll down the page in the General Settings tab.
This will allow you to set up the account settings.
- Ensure the Verification box displays Per Property (requires user application)
- Ensure that the Request for Proof boxes are set to on (this means all applicants must provide this information to have their account approved)
You will only need to do this part of the set-up process one time.
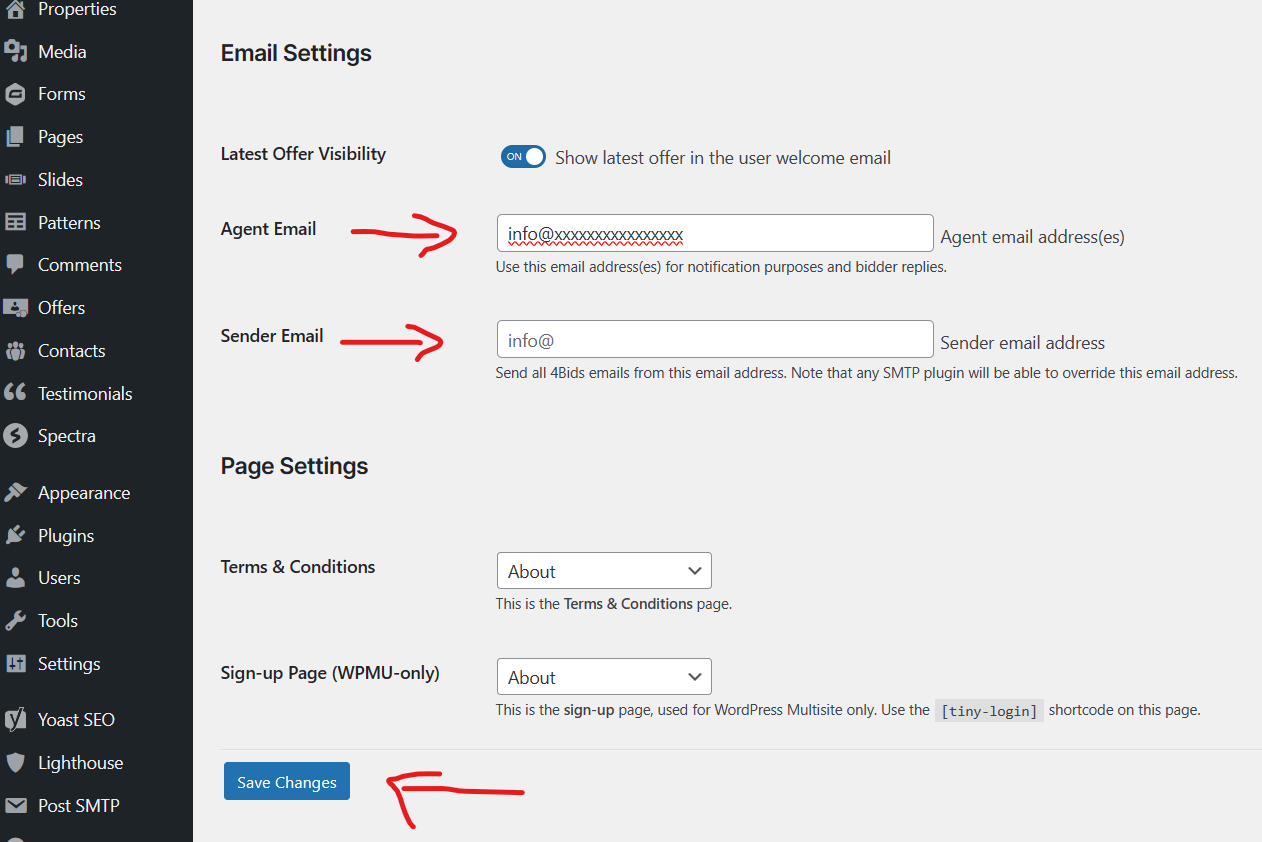
Step 7. Scroll down to the bottom of the page in the General Settings tab to Email Settings.
- Enter agent’s email address (e.g. info@) – this email will receive all notifications
- Ensure that you click Update (blue button)
You will only need to do this part of the set-up process one time.
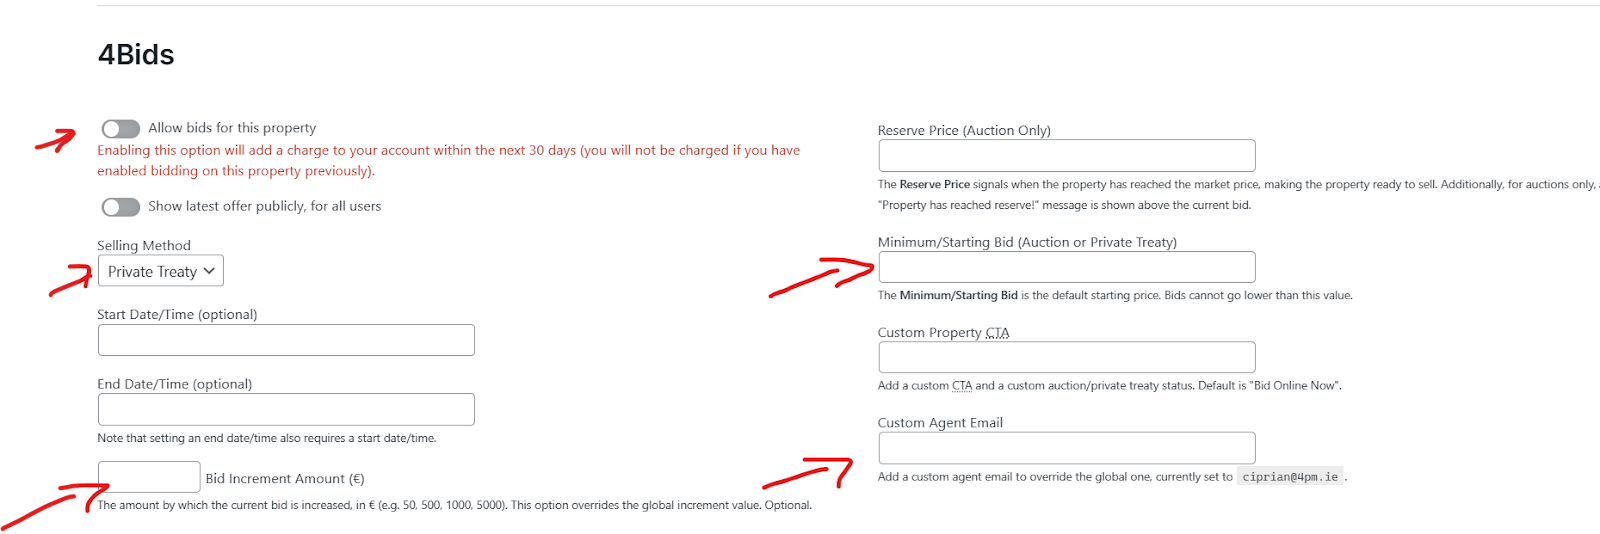
Step 8. To Activate A Property For 4Bids To Allow Online Bids
- Click Properties in the Dashboard. This will display all properties that are listed on your website.
- Hover over and click on the property listing that you want to activate for 4Bids (highlighted in blue).

- The description of the listing will appear. Scroll down to the bottom of the page, where you will see the 4Bids section.
- To activate 4Bids, turn on the Allow bids on this property. Select Private treaty/Auction. The bid increments will be pre-set to €1000 per bid. You can change this amount if you want by entering the new amount.
- You can set a minimum bid amount (may be lower than the asking amount).
- Enter the selling agent’s email address into the box Custom Agents Email. This ensures the selling agent will get notifications on their sale.
- Ensure you press Update (blue button) .
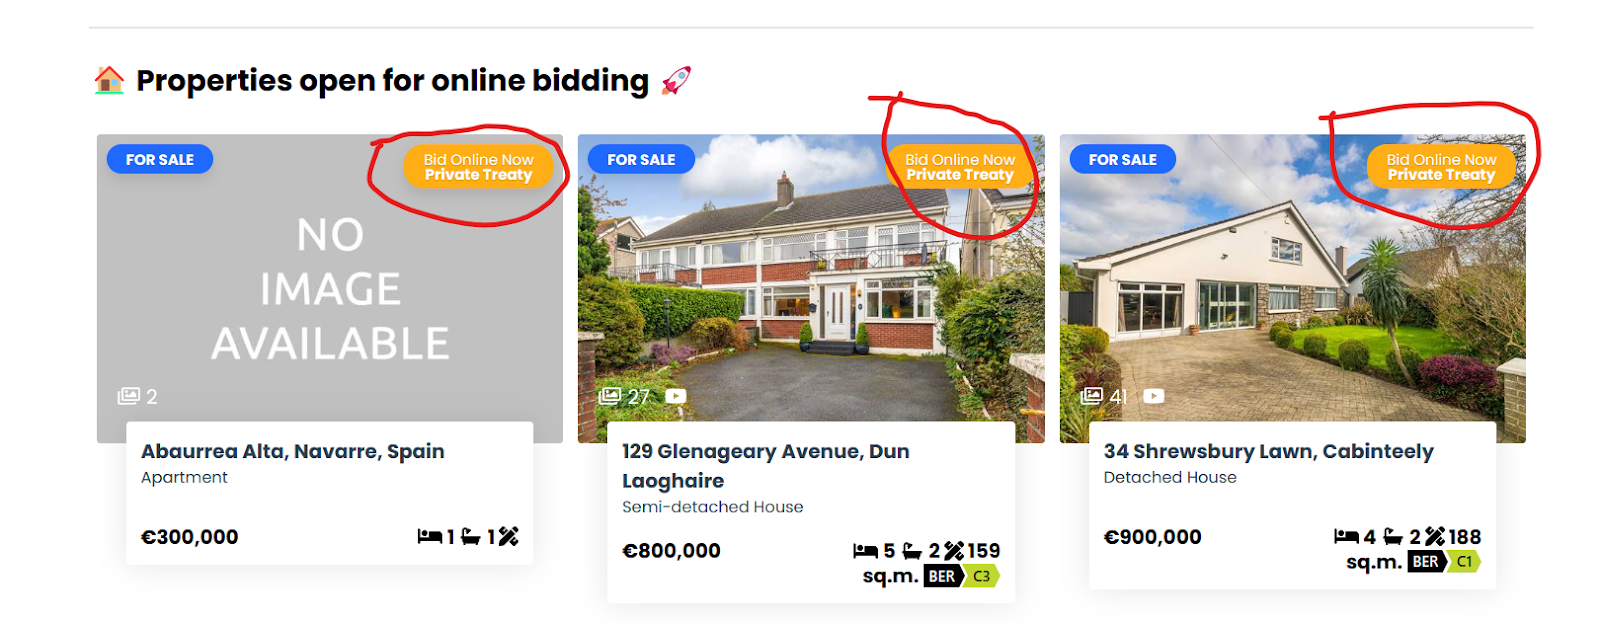
Step 9. Congratulations! Your property listing is now activated for online bidding!
Your property will display the 4Bids badge on the top right-hand corner of the image on the listing.